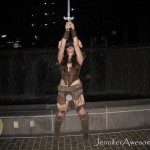
I just wanted to share some photos of my finished Skyrim cosplay costume. These pictures were taken while adventuring outside the hotel.
 My boyfriend took an arrow to the knee. His adventuring days are over.
But I still get to adventure:


I just wanted to share some photos of my finished Skyrim cosplay costume. These pictures were taken while adventuring outside the hotel.
My boyfriend took an arrow to the knee. His adventuring days are over.
But I still get to adventure:
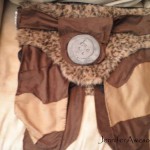
Here’s the skirt I made for my Skyrim hide armor costume.
The skirt for the hide armor is made from several layers of fabric. I started by making the black under layer from a stretchy black fabric. It’s double layered with the same black fabric. I then made the fur layer and sewed it to the black under skirt around the top. The patchwork “hide” flaps are attached to the bottom of the fur layer. I put a zipper closure on the side of the skirt and made the belt completely separate from the skirt.


The belt is held on with Velcro under the skull medallion on the front, but I ended up using safety pins to better hold it together. The medallions are made from Foamies that I painted silver. Eventually, I’m planning on switching those medallions out with something better, possible real metal, if I can think of a better way to make them.
I didn’t have time to make the actual hide bracers, so I ended up just making generic bracers from the same fabric I used for the top of my hide armor.
I would have posted earlier, but I was still working on my costume up until a few hours before we had to leave for the Matsuricon.
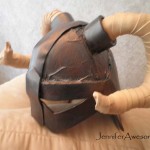
Here are some photos of my iron helmet.


I made the entire helmet out of Foamies sheets (2mm for the horns and detailing and I believe 5mm for the helmet itself). I used several layers of acrylic paint to give it a well-worn look. I started with metallic silver. It was too light, so I mixed that paint with black to give it a darker color. I added yet another layer of silver/black paint using a spongy brush (that’s the technical term!) to give it more of a “worn” texture. I then applied some bronze paint with a spongy brush to give it a rusty effect. Some of the battle damage was created using clear packaging tape underneath the paint.
For the horns, I created the basic horn shape using newspaper and tape. I then cut strips of Foamies and super glued them around the news paper horns. I painted them a sort of off-white at first, but it was much too light, so I mixed white, brown, and yellow to make the tan color you see now. The horns are super glued onto the helmet.
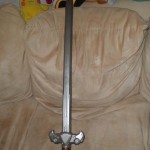
I was originally going to make a Dawnbreaker sword (actually, two of them, so I could dual wield like I had my character do after exploiting a glitch in the Break of Dawn quest), but I’m running out of time to finish my costume and couldn’t find anything to use as the light for the top of the hilt. Instead, I just made a generic sword painted in a similar fashion to the Imperial sword.
I simply used acrylic paint on a Nerf sword to make it a similar color to the Imperial sword in Skyrim. (Anything is better than the original blue color). I may eventually make a couple Dawnbreakers for a future cosplay. Eventually, I may attempt to remove the horrible “Nerf” logo from this sword and mod the hilt to more closely resemble the Imperial sword using foam or air-dry clay.

Also, fun fact: I keep accidentally typing “nerd” instead of “Nerf.”
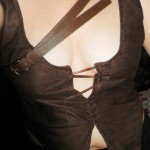
I have the top part of my Hide Armor for my Skyrim cosplay finished. It is made from a brown soft kind of leathery/velvety material.
The shirt is double layered, lined with the same material that I used for the outside. I MacGyvered the pattern by taping together several sheets of paper and tracing a tanktop, then simply altering the outline to match the outfit worn by my Skyrim character. I put a zipper on the side to make it easier to get on and off.
")
After I finished sewing together the top, I sewed little x’s around all of the edges to give it more . That took a lot longer that I thought it would, but I think it makes it look better than if I had just left the edges unfinished.
I then used leather lacing for the lacing on the front. The top of the lacing is sewn on, but the rest is just going through loops I made with thread to allow the lacing to be tightened as needed.
The pauldron or whatever it’s called (I like to call them “shoulder armor thingies”) is made from rubber foam with the same fabric I used for the top covering it. It is held on with a plus-sized belt I found at Goodwill.

I have the skirt about halfway done. I’m hoping to finish it tomorrow. My Iron Helmet and sword are both also about halfway finished. I haven’t even started on my Hide Bracers or Tavern Clothes yet, but I think I can get everything finished in time for the con (which is in 1 week!). If I still have any time left over, I may also make a Hide Helmet so I can take advantage of the Custom Fit and Matching Set perks! Eventually I may make a matching Hide Shield, for future cons, though I never use a shield in the game and don’t really feel like carrying one around in real life.
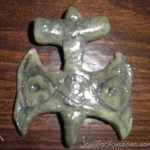
I finished my Amulet of Talos for my Skyrim cosplay (aside from putting it on a necklace).
The amulet is made from green Sculpey III Granitex clay that I’ve had sitting around my parents house for probably the better part of a decade. I haven’t actually worked with polymer clay since I was a teenager, which is probably why it came out looking a little odd.
When the clay cooled after baking, it noticed that the amulet seemed kind of brittle. I assume since Sculpey III is marketed to children, it might not be the best quality clay on the market. To attempt to strengthen it, I coated it with super glue.
Even with the stone effect from the granitex clay, it didn’t have the right look I was going for, so I used various shades of eyeshadow (greens, black, and a little blue) to give it a more aged/worn look before coating it with super glue. After the super glue was dried, I coated it with Sculpey Gloss Glaze. It did end up shinier than I intended because of the glaze.

If there is any interest, I may make a few more of these for my Etsy shop, once I get it set up. I will probably start adding items on Etsy (mostly video game inspired pieces) after Matsuricon. I already have some ideas on how I can improve the Amulet of Talos for Etsy customers.
The rest of my Skyrim cosplay is coming along nicely. I have the top part of the hide armor finished, and my helmet and sword are coming along nicely. Stay tuned for pictures!
Though I’ve barely posted in this blog, I have decided to take it in a whole new direction. From now on, I will use it to showcase my creative endeavors. Aside from writing (if I ever actually get around to finishing any more short stories or novels) I will post about cosplay, other craft projects, etc.
Lately I’ve been busy working on costumes for Matsuricon, which is coming up in only two weeks. I plan on finishing two different Skyrim costumes in time for the con.
Stay tuned to see my:
In my overly ambitious state, I also plan on becoming more fluent in the language of the Dovah in time to yell random dragony things at people who have no idea what I’m saying at the con, as well as perfect my in-progress Dovah translation of The Dragonborn Comes
A redesign may also be coming to this blog, when I get around to it. The current layout doesn’t contain enough dragons.